spring5

spring5常用配置
需要写一个配置文件
<?xml version="1.0" encoding="UTF-8"?>
<beans xmlns="http://www.springframework.org/schema/beans"
       xmlns:xsi="http://www.w3.org/2001/XMLSchema-instance"
       xsi:schemaLocation="http://www.springframework.org/schema/beans
        http://www.springframework.org/schema/beans/spring-beans.xsd">
 <bean class="com.stu.pojo.Collection" id="collection">
</beans>
- bean标签
- 通过配置bean标签告诉IOC容器需要创建对象的组件是什么
- id属性:唯一标识,指定Bean的名称,在Bean被别的类依赖时使用
- name属性:用于指定Bean的别名,如果没有id,也可以用name
- 少用,是为了以前的框架准备的
- class属性:用于指定Bean的来源,要创建Bean的class类,需要全限定名
- scpoe:属性
- singleton:默认值,单例,加载配置文件的时候调用
- prototype:原型的意思,在这里是多例,比如SqlSession这个特殊的对象
- 调用getbean方法的时候调用
- 默认使用无参构造方法反射创建对象
- 否则抛出异常
IOC原理
为了解耦,把对象创建和对象调用交给spring
原理
- xml解析出全类名
- 工厂模式
- 通过反射创建实例
IOC接口
- IOC容器本质就是对象工厂
- IOC对象容器的本质,map容器,concurrentHashMap集合
- 有两种实现方式,两个重要的接口
- BeanFactory
- spring内部使用接口,不提供开发人员进行使用,
- 抉择配置文件不会创建对象,获取对象时才去创建
- ApplicationContext
- BeanFactory的子接口,给开发人员使用
- 加载配置文件时,就会创建对象,配置文件里的所有对象
- 接口实现类两个
- FileSystemXmlapplicationContext
- 文件的路径
- ClassPathXmlapplicationContext
- 加载配置文件
- FileSystemXmlapplicationContext
- BeanFactory
导入Spring框架依赖jar包
<dependency>
    <groupId>org.springframework</groupId>
    <artifactId>spring-context</artifactId>
    <version>5.2.6.RELEASE</version>
</dependency>
获得spring容器创建的对象
通过类的class文件对象获取
 //读取配置文件
    private  ApplicationContext context = new ClassPathXmlApplicationContext("applicationContext.xml");

  Collection bean = context.getBean(Collection.class);
        xxx = bean.getxxx();
依赖注入-DI
dependency Inject(依赖注入的意思)
直白点说,为类的字段赋值就是注入 ----------------由自己赋值,变成由spring赋值
值:来自对象容器的值
准确的说,注入的是set方法名,去掉set,方法小写开头,
字段名随便,类似,vue调用get方法,无需字段也可-
set方法注入
value属性注入的是一个值
    <bean class="com.stu.pojo.Collection" id="collection">
<property name="userName" value="叶子"></property>
        </bean>
注入自定义对象
ref表示引用,refrence 引用另一个 对象的ID
  <!-- ref 属性:通过 bean 的 id 引用另一个 bean -->
    <property name="happyMachine" ref="happyMachine"/>
构造方法注入--有参构造,了解即可
- spring值用双引号,会自动转换
- name属性是有参构造参数名,不关字段名的事
<bean class="com.stu.pojo.Collection" id="collection">
<constructor-arg name="id" value="99"></constructor-arg>
    <constructor-arg name="money" value="8.55"></constructor-arg>
    <constructor-arg name="name" value="李四"></constructor-arg>
           </bean>
复杂数据类型注入
<!--        复杂数据注入-->

<!--        数组注入-->
        <property name="myStrs">
            <array>
                <value>数组1</value>
                <value>数组2</value>
                <value>数组3</value>
            </array>
        </property>

<!--        list注入-->
        <property name="myList">
            <list>
                <value>列表1</value>
                <value>列表2</value>
                <value>列表3</value>
            </list>
        </property>

<!--        输出map-->
        <property name="myMap">
            <map>
                <entry key="key1" value="value1"></entry>
                <entry key="key2" value="value2"></entry>
                <entry key="key3" value="value3"></entry>
            </map>
        </property>

<!--        输出配置文件-->
        <property name="myPro">
            <props>
                <prop key="pro1">value1</prop>
                <prop key="pro2">value2</prop>
                <prop key="pro3">value3</prop>
            </props>
        </property>
p命名空间方式注入(了解)
引入p命名空间的约束
xmlns:p="http://www.springframework.org/schema/p"
<!--注入简单类型数据-->
<bean class="com.stu.pojo.Collection" id="collection" p:userName="叶子">
</bean>

直接写在bean里
引入外部属性文件用于给Bean注入属性
<!-- MySQL驱动 -->
<dependency>
    <groupId>mysql</groupId>
    <artifactId>mysql-connector-java</artifactId>
    <version>5.1.3</version>
</dependency>
<!-- 数据源 -->
<dependency>
    <groupId>com.alibaba</groupId>
    <artifactId>druid</artifactId>
    <version>1.0.31</version>
</dependency>
创建外部属性文件
jdbc.user=root
jdbc.password=root
jdbc.url=jdbc:mysql://localhost:3306/mybatis
jdbc.driver=com.mysql.jdbc.Driver
引入命名空间
 xmlns:context="http://www.springframework.org/schema/context"
 xsi:schemaLocation="http://www.springframework.org/schema/beans http://www.springframework.org/schema/beans/spring-beans.xsd
                            http://www.springframework.org/schema/context http://www.springframework.org/schema/context/spring-context.xsd">
引用外部配置文件
<!-- 引入外部属性文件 -->
<context:property-placeholder location="jdbc.properties"></context:property-placeholder>
在spring的配置文件中使用引入的jdbc.properties文件中的数据
<!--[重要]给bean的属性赋值:引入外部属性文件 -->
<bean id="druidDataSource" class="com.alibaba.druid.pool.DruidDataSource">
    <property name="url" value="${jdbc.url}"/>
    <property name="driverClassName" value="${jdbc.driver}"/>
    <property name="username" value="${jdbc.user}"/>
    <property name="password" value="${jdbc.password}"/>
</bean>
注解管理bean
注解的优势
注解本身并不能执行,注解本身仅仅只是做一个标记
注解开发比使用XML更加简洁明了
包扫描
<!--        包扫描-->
    <context:component-scan base-package="com.stu"/>
要排除的组件
<!--        包扫描-->
    <context:component-scan base-package="com.stu"/>
 <!-- context:exclude-filter标签:指定排除规则 -->
    <!-- type属性:指定根据什么来进行排除,annotation取值表示根据注解来排除 -->
    <!-- expression属性:指定排除规则的表达式,对于注解来说指定全类名即可 -->
    <context:exclude-filter type="annotation" expression="org.springframework.stereotype.Controller"/>
</context:component-scan>
扫描指定组件
只扫描某种注解
<!--        包扫描-->
    <context:component-scan base-package="com.stu" use-default-filters="false"/>
  <!-- context:include-filter标签:指定在原有扫描规则的基础上追加的规则 -->
    <context:include-filter type="annotation" expression="org.springframework.stereotype.Controller"/>
</context:component-scan>
常用的注解
Component注解
该注解主要用在普通类上,比如Utils类
该注解衍生出了以下三个注解,用法完全一样,为了更加清晰的提现层的概念。
四个在本质上是没有区别的
//配置数据库相关
//引入外部文件
@Component
@PropertySource("jdbc.properties")
public class JdbcConfig {
}
Controller注解
主要用在控制层的类上
@Controller
public class UserController {
}
Service注解
业务层的实现类
@Service
public class UserServiceImpl implements UserService {
}
Repository注解
持久层的实现类上
将来由Mybatis负责扫描,也不需要使用Repository注解。
@Repository
public class UserDaoImpl implements UserDao {
}
注解属性value
单一值,可以注解在字段上
//配置数据库相关
//引入外部文件
@Component
@PropertySource("jdbc.properties")
public class JdbcConfig {

    @Value("${jdbc.user}")
    private String user;
    @Value("${jdbc.password}")
    private String password;
    @Value("${jdbc.url}")
    private String url;
    @Value("${jdbc.driver}")
    private String driver;
}
根据类型装配
Autowired注解----------常用 byType类型
按照类型注入,如果无法确定唯一类型(接口有多个实现类),
需要配合注解@Qualifier的使用,@Qualifier("id")。
无需setXXX方法。暴力反射注入
根据名字装配,一般和autowried一起使用
@Qualifier注解-------根据byName装配,适合多个实现类时
@Autowired
    @Qualifier("accountDao")
    private AccountDao accountDao;
纯注解开发
为了给将来学习SpringBoot打基础
SpringBoot中,就是完全舍弃XML配置文件
相关注解
- @Configuration标识当前类是Spring的一个配置类
- @ComponentScan替代xml中的
<context:component-scan/> - @Import引入其他配置类,被引入的配置类可以不加@Configuration注解
- @PropertySource:引入外部properties文件,注意加classpath:
- @Value对成员变量赋值------除了对象以外的
- @Bean将一个方法的返回值对象加入到Spring的容器当中管理
- @Qualifier可以使用在方法上,表明对应的形参引入/注入的对象类型
- 和autowired一起使用
创建配置类
配置类上要添加一个@Configuration注解
使用@ComponentScan注解进行包扫描
//注明是配置文件
//包扫描
@Configuration
@ComponentScan("com.stu")
public class SpringConfig {
}
在配置类中配置bean
使用@Bean注解配置第三方的类的IOC
从properties文件中读取数据
//配置数据库相关
//引入外部文件
@Component
@PropertySource("jdbc.properties")
public class JdbcConfig {

    @Value("${jdbc.user}")
    private String user;
    @Value("${jdbc.password}")
    private String password;
    @Value("${jdbc.url}")
    private String url;
    @Value("${jdbc.driver}")
    private String driver;
}
配置连接池和工具类
//引入连接池
    @Bean          返回值到ioc容器
    public  DataSource getDataSource(){
        //获得连接池对象
        DruidDataSource druidDataSource = new DruidDataSource();
        druidDataSource.setUsername(user);
        druidDataSource.setPassword(password);
        druidDataSource.setUrl(url);
        druidDataSource.setDriverClassName(driver);
        return druidDataSource;
    }
    //注册qr数据库类,传入连接池参数
    @Bean
    public QueryRunner getQueryRunner(DataSource dataSource){
        QueryRunner queryRunner = new QueryRunner(dataSource);
        return queryRunner;
    }
Spring整合junit4
junit版本必须要4.12及以上
加入依赖
<!--    junit整合-->
    <dependency
      <groupId>org.springframework</groupId>
      <artifactId>spring-test</artifactId>
      <version>5.2.6.RELEASE</version>
    </dependency>
    <dependency>
      <groupId>junit</groupId>
      <artifactId>junit</artifactId>
      <version>4.12</version>
      <scope>test</scope>
    </dependency>
junit运行的时候底层使用了Runner对象,有一个默认使用的Runner对象。
Spring对junit的支持,其实是自己实现了一个Runner对象
//Spring框架中的Runner对象,替换Junit中的runner对象
@RunWith(SpringJUnit4ClassRunner.class)
//框架启动入口,配置类启动
@ContextConfiguration(classes = SpringConfig.class)
public class TestUser {
    //注入业务层
    @Autowired
    private UserService userService;
//test整合
    @Test
    public void testNoXml(){
        User user = new User();
        user.setUserName("小龙");
        user.setSex("2");
        user.setBirthday(new Date());
        user.setAddress("广西");
        userService.saveUser(user);
    }
xml配置文件启动
@RunWith(SpringJUnit4ClassRunner.class)
@ContextConfiguration(locations = "classpath:applicationContext.xml")
AOP面向切面编程
aop底层使用的是动态代理模式
未经过代理的情况:

使用了代理模式的情况:

基于注解的AOP用到的技术
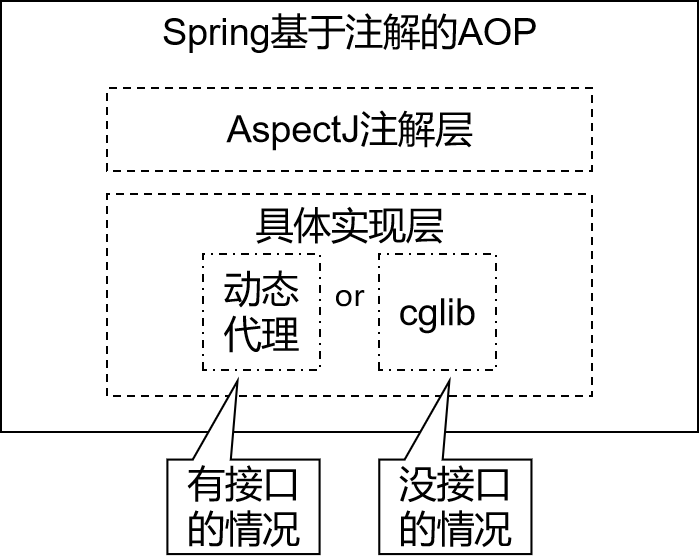
动态代理(InvocationHandler):JDK原生的实现方式,需要被代理的目标类必须实现接口。因为这个技术要求代理对象和目标对象实现同样的接口。
cglib:通过继承被代理的目标类实现代理,所以不需要目标类实现接口。
AspectJ:本质上是静态代理,将代理逻辑“织入”被代理的目标类编译得到的字节码文件,所以最终效果是动态的。weaver就是织入器。Spring只是借用了AspectJ中的注解。
连接点
类的哪些方法可以被增强,这些方法就是连接点
切入点
实际被增强的方法,叫做切入点
而切入点指的则是方法中真正要去配置增强或者配置修改的地方
//相同切入点抽取,作为公共的
@Pointcut("execution(* com.stu.aopanno.User.add(..))")
    public void pointdemo(){ }
通知(增强)
实际增强的逻辑部分称为通知,
原本代码不存在的,自己后添加的
比如在登录,添加逻辑判断,这部分就是通知或者说是增强
-
前置通知
-
目标方法前执行
-
@Before表示前置通知
 @Before("pointdemo()")
-
-
后置通知(返回通知)
-
目标方法返回值后通知(寿终正寝)
-
如果出现异常,下面代码不会执行
方法返回值之后执行
 @AfterReturning("pointdemo()")
-
-
环绕通知-------用的比较多
-
通常情况下,环绕通知都是独立使用的,不要和上面的四种通知类型混合使用
-
方法有一个参数
- ProceedingJoinPoint进程切入点对象,执行我们的业务逻辑方法
- proceed() 执行我们自己的业务逻辑方法
-
//环绕通知,之前之后都会通知
 @Around("pointdemo()")
  public void around(ProceedingJoinPoint proceedingJoinPoint) throws Throwable {
        System.out.println("环绕之前");
        //执行被增强的方法
        proceedingJoinPoint.proceed();
        //如果出现异常,下面代码不会执行
        System.out.println("环绕之后");
    }
-
-
异常通知
-
目标方法异常结束后执行(死于非命)
-
@AfterThrowing("pointdemo()")
-
-
最终通知
-
目标方法最终结束后执行
-
不管有没有异常都会执行
-
//最终通知,不管有没有异常,都会执行
@After("pointdemo()")
-
切面-是一个过程,一个动作
把通知添加到切入点过程就叫做切面
添加依赖
 <!-- spring-aspects会帮我们传递过来aspectjweaver -->
  <dependency>
          <groupId>org.springframework</groupId>
          <artifactId>spring-aspects</artifactId>
          <version>5.2.6.RELEASE</version>
      </dependency>
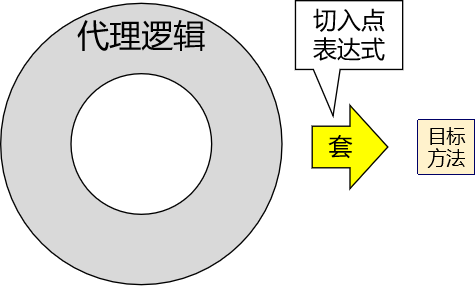
切入点表达式

用于描述将代理逻辑套用在哪些目标方法上
对哪个类里面的哪个方法进行增强
语法结构
固定单词
execution()
三种常用表达式
- execution(* com.stu.aopanno.User.add(..) )
- 为了方便,权限修饰符一般设为*表示任意类型,后面有空格
- 返回类型可以省略
- 跟着类的全类名点上方法名
- 方法名和全类名前面用点连接
- 括号里面是参数列表,为了方便,一般用..表示
- ....表示有无参数均可,参数可以是任意类型
- execution(* com.stu.aopanno.User.*(..) )
- 表示对类里面的所有方法进行增强
- execution(* com.stu.aopanno.*.*(..) )
- 表示这个包所有类,类里面的所有方法进行增强
- execution(* com..service.*.*(..) )--------石老师推荐
- com下的任何子包里的service
基于注解的AOP
置Spring框架启动类
//设置为配置文件
@Configuration
//扫描包
@ComponentScan("com.stu")
//开启aspect生成代理对象
//启用动态代理
@EnableAspectJAutoProxy
public class SpringConfig {
}
原始类
//添加到ioc容器
@Component
//原始类
public class User {
    public void add(){
        System.out.println("我是添加用户的方法");
    }
}
增强类
//原始类增强
@Component
//生成代理对象
@Aspect
public class UserProxy {
    //相同切入点抽取,作为公共的
    @Pointcut("execution(* com.stu.aopanno.User.add(..))")
    public void pointdemo(){

    }
    // @Before表示前置通知
    //指定哪个类的哪个方法做一个增强
    @Before("pointdemo()")
    public void before(){
        System.out.println("前置通知方法");
    }
    //最终通知切入点表达式,方法之后执行
    //最终通知,不管有没有异常,都会执行
    @After("pointdemo()")
    public void after(){
        System.out.println("后置通知方法");
    }
    //后置通知,方法返回值之后执行,    //如果出现异常,下面代码不会执行
    @AfterReturning("pointdemo()")
    public void afterReturning(){
        System.out.println("@AfterReturning方法,貌似也是后置");
    }

    //异常通知,出现异常时才会通知
    @AfterThrowing("pointdemo()")
    public void afterThrowing(){
        System.out.println("@AfterThrowing异常通知");
    }

    //环绕通知,之前之后都会通知
    @Around("pointdemo()")
    public void around(ProceedingJoinPoint proceedingJoinPoint) throws Throwable {
        System.out.println("环绕之前");
        //执行被增强的方法
        proceedingJoinPoint.proceed();
        //如果出现异常,下面代码不会执行
        System.out.println("环绕之后");
    }
}
相同切入点抽取,作为公共的
在一处声明切入点表达式之后,其他有需要的地方引用这个切入点表达式
双点可以使用*代替
 @Pointcut("execution(* com.stu.aopanno.User.add(..))")
    public void pointdemo(){ }
同一个类内部引用切入点
通过方法名引入
 // @Before表示前置通知
    //指定哪个类的哪个方法做一个增强
    @Before("pointdemo()")
    public void before(){
        System.out.println("前置通知方法");
    }
在其它类中引用切入点
通过全限定名引入
   @Before("com.stu.aopanno.UserProxy.pointdemo()")
	public void before2(){
        System.out.println("前置通知方法");
    }
对项目中的所有切入点进行统一管理
作为存放切入点表达式的类,可以把整个项目中所有切入点表达式全部集中过来,便于统一管理:
public class UserPoPointCut {
    @Pointcut("execution(* com.stu.aopanno.User.add(..))")
    public void userPointCut(){
    }
}
JDBCTemplate
导入依赖
   <!-- Spring 持久化层支持jar包 -->
    <!-- Spring 在执行持久化层操作、与持久化层技术进行整合过程中,需要使用orm、jdbc、tx三个jar包 -->
    <!-- 导入 orm 包就可以通过 Maven 的依赖传递性把其他两个也导入 -->
    <dependency>
        <groupId>org.springframework</groupId>
        <artifactId>spring-orm</artifactId>
        <version>5.3.1</version>
    </dependency>
增删改操作
jdbcTemplate.update(String sql,Object... args)
查询操作
返回单个简单类型
jdbcTemplate.queryForObject(sql, 要返回的类class);
 //查询员工的个数
    String sql = "select count(emp_id) from t_emp";
    Long count = jdbcTemplate.queryForObject(sql, Long.class);
这两个是同样的方法
查询返回单个值(聚合函数)
jdbcTemplate.queryForObject(String sql,Class requiredType);
第二个参数,返回类型的类class
/查询账户总条数
 String sql = "select count(id) from account";
Integer count = jdbcTemplate.queryForObject(sql,Integer.class)
查询返回对象,有参的情况
jdbcTemplate.queryForObject(String sql,RowMapper rowMapper,Object...args)
rowmapper 是接口,返回不同类型数据,有实现类
RowMapper接口实现类BeanPropertyRowMapper,查询的结果集封装,适用单个对象或者集合
  //id查询账户
   String sql = "select id,name,money from account where id = ?";
 return jdbcTemplate.queryForObject(sql,new BeanPropertyRowMapper<Account>(Account.class),id);
查询//查询多个员工信息 返回list集合
jdbcTemplate.query(String sql,RowMapper rowMapper,Object...args)
RowMapper接口实现类BeanPropertyRowMapper,查询的结果集封装,适用单个对象或者集合
//查询多个员工信息,封装到List<Employee>中
  String sql = "select emp_id empId,emp_name empName, emp_salary empSalary from t_emp";
    List<Employee> list = jdbcTemplate.query(sql, new BeanPropertyRowMapper<>(Employee.class));